


With one build already under his belt, Keith Kral new just what he was up against before starting his second homewall this past May. Now, Keith has the perfect setup in Round Rock, TX, at his new house to stay strong for outdoor projects! Check out past HWOW here.
When did you build your wall? Was it a COVID baby?
May 2021. This is the 2nd homewall we built. The 1st wall we built was indeed a COVID baby that we constructed at the start of the pandemic, however we had to retire it prior to moving. Knowing the convenience of having a training wall at home, we established a 2nd wall at our new home.
How long did it take you to build and what did that time look like?
It took roughly ~70 worker-hours to construct, but the time was broken up over nights and weekends when the weather didn’t support climbing outside. A breakdown of the time was: ~15% planning, ~30% framing, ~50% plywood/t-nuts, ~5% monkeying around on a partially built wall. Big thanks to my girlfriend and father for helping build it!
Not including holds and padding, how much did it cost you to build? Any surprises there? Most/Least expensive part?
It cost roughly ~$1,200 in building materials excl. holds & padding. A breakdown of the cost was: ~$400 for plywood, ~$150 for t-nuts, ~$200 for screws & fasteners/hangers, ~$450 for framing lumber. Lumber definitely increased in price since our 1st home wall built in March 2020.

What are you doing for padding?
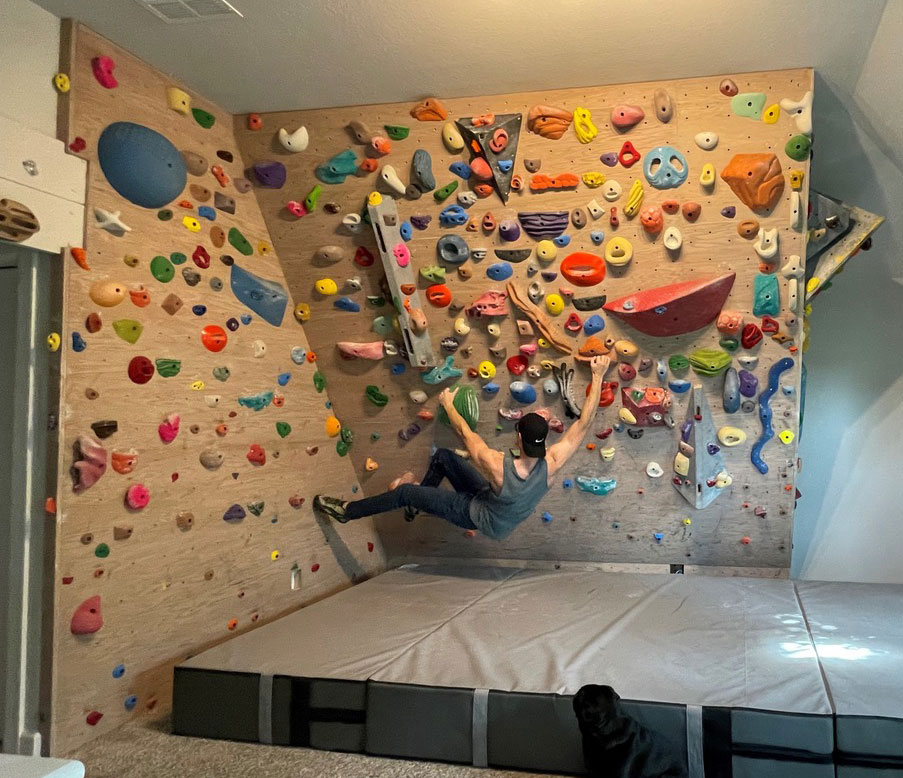
We purchased a 12” thick gymnastics crash mat for the padding, which was an upgrade from our 1st wall. We chose a cheaper option for our 1st wall (outdoor bouldering crash pads that we already had and a memory foam mattress), but it was a hassle to move pads around for longer routes and horizontal falls from the top were quite unpleasant. Also, we learned after an unfortunate fall & injury while bouldering outside that medical bills cost much more than good padding.
What was your primary incentive for the wall? Did anything in particular inspire your wall design?
Training for outdoor climbing. We also don’t live very close to any indoor climbing gyms. We got a lot of inspiration for our design from an online home climbing wall forum, as well as natural features and movement experienced outside.
What was the most difficult aspect of the design and build?
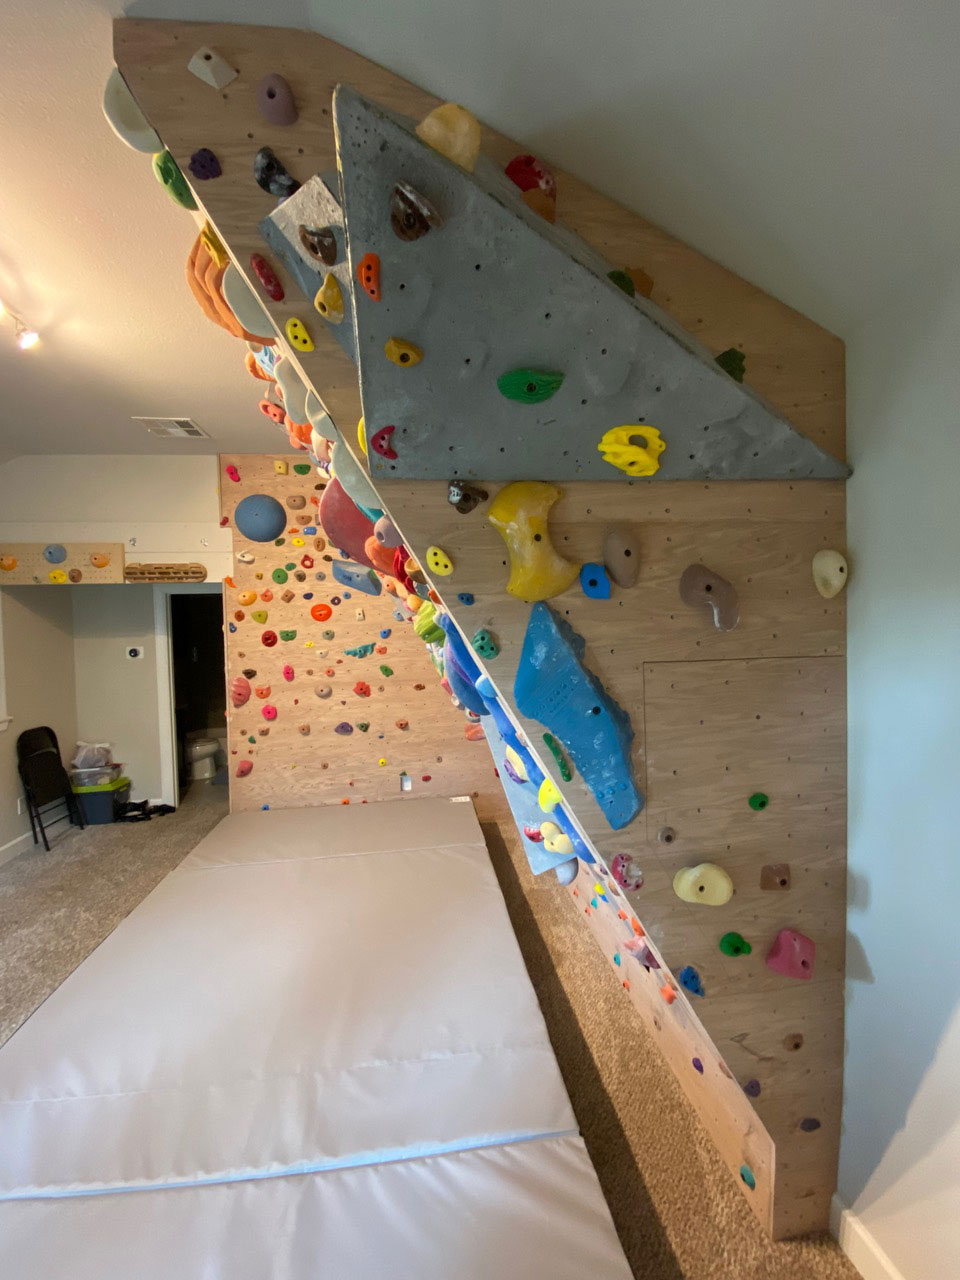
Keeping things square and accounting for any irregularities in the level of the wall/ceiling was quite difficult. It can make the cuts very complicated, which can be exacerbated by limited tools. Also, trying to meet two sheets of plywood edge to edge on the center of a 2” wide board and placing screws in each without splitting the edge was a challenge; I’d recommend ending each plywood edge on its own 2” wide board and accounting for the extra width in the t-nut spacing.
What would you do differently?
Not much on this wall since we learned a lot from our 1st wall. One thing we learned was that it saves a lot of time checking/fixing the t-nuts while the plywood is on the ground and easy access to the t-nuts in the future is necessary to deal with inevitable spinners. We also placed our holes/t-nuts much closer on this wall (4-6” vs. 8” spacing) to open up more hold placement opportunities.
Did you make any mistakes along the way or choose to re-do any aspects? If so, what?
There were mistakes along the way that required some creative solutions. One mistake was not properly accounting for the crown on the primary vertical joists. After fully assembling the frame, I quickly realized that the edge where the plywood would attach too varied in level across the wall. To remedy I hit the bulging spots with an electric planer, which resulted in one of the top three messes of my entire life. The entire room looked like a hamster’s cage from the wood chips. The mess and subsequent clean-up could’ve been avoided! Also, be very careful trying holds out before you place set screws…

What is your favorite aspect?
The size (width & height), variety of features (arete, dihedral, vertical, 30⁰) and spray of holds enables lots of creative possibilities! It’s also nice that our wall is inside; it allows our dog (pug named Vader) to hang out and join the climbing festivities.
How often do you re-set your wall?
We’ve only had our current wall for ~2 months, so we haven’t done a major reset yet. I imagine we’ll do a major reset every 6 months or so, apart from the continuous trickle in of new holds and tweaks here and there.
How often do you use the wall? Do you think you’ll still use it as much now that gyms are open again?
We use the wall ~twice a week on average. We try to go outside to climb as much as possible, but if time or weather doesn’t permit then we’ll train on the home wall. It’s also nice to be able work out moves from outdoor projects at home at any time. We try to rotate our climbing with weights & other exercises like trail running or biking. Since we don’t live very close to any indoor gym, I think we’ll continue using it regularly.
Any words of wisdom to aspiring homewallers?
Spend the time up front planning; it will ultimately save you time and money in the long run. Before getting materials or starting to build, really think about the space you’re planning to build in and how you can best make use of the space. After you’ve thought about a general design, size, space and features, then consider the constructability. It’s one thing to design something on paper; it’s another thing to build it. Use the design to enable easier construction and minimize material wastage. The ambience of the space is also something to consider; if it feels inviting (light, temperature, fresh air…) then you’re more likely to want to use it.
Want us to consider your woody for a future Homewall of the Week? Submit your homewall here to be considered. Winners get a $100 giftcard to Atomik to pick out some goodies for their homewall. Thanks Kenny!
Climbing Business Journal is an independent news outlet dedicated to covering the indoor climbing industry. Here you will find the latest coverage of climbing industry news, gym developments, industry best practices, risk management, climbing competitions, youth coaching and routesetting. Have an article idea? CBJ loves to hear from readers like you!


